Staging a house can be as fun as it is important, I should know, I genuinely enjoy the process of turning a house into a space that wows potential buyers. I don’t know if it’s the rearranging furniture to create an inviting atmosphere, or adding throw pillows for a cozy touch, or sprucing up outdoor living spaces, every detail plays a role. It’s worth it based on the payoff. According to a recent study from the NAR, 27% of sellers’ agents noticed slight decreases in market time when the home was staged.
To help you get started, I’ve created a free home staging checklist that you can download as a printable PDF or Excel. This is your free home staging checklist, packed with helpful staging tips for prepping your space. It includes everything from maximizing storage space and enhancing curb appeal to ensuring as much natural light as possible floods the rooms. And yes, I’ve even added reminders for simple touches like a fresh coat of paint on walls, polishing light fixtures, and removing personal items like family photos. Each step is designed to draw in prospective buyers and help them visualize their future home. I’ve even had a lot of fun playing with virtual home staging software tools, and I’ll talk more about that at a later date.
Download This Free Home Staging Checklist
PDF | Excel Spreadsheet | Google Sheets

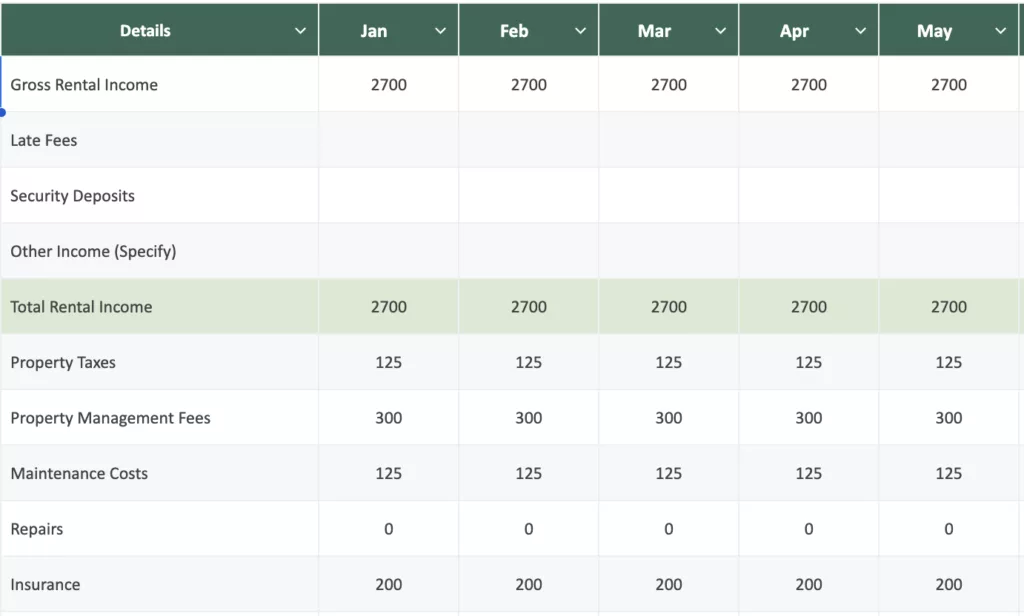
Home Checklist Staging Example
| Task | What It Means / What to Look For |
|---|---|
Living Room |
|
De-clutter |
Remove unnecessary furniture and decorative items to create a spacious and inviting atmosphere. |
Furniture placement |
Arrange furniture to highlight the room’s flow and maximize space. |
Add throw pillows and blankets |
Use neutral or soft-colored throw pillows and blankets to add warmth and texture. |
Clean and polish surfaces |
Ensure coffee tables, end tables, and shelves are spotless and free of dust. |
Add fresh flowers or potted plants |
Introduce greenery to create visual interest and a welcoming vibe. |
Kitchen |
|
Clear countertops |
Remove small appliances and clutter to showcase workspace. |
Organize cabinets |
Tidy up cabinets and pantry to highlight storage space. |
Add a bowl of fresh fruit |
Use vibrant fruit to add a pop of color and freshness. |
Replace outdated hardware |
Swap old cabinet handles for modern ones to update the look. |
Deep clean |
Scrub all surfaces, including appliances, to ensure a spotless kitchen. |
Bathrooms |
|
Add fresh towels |
Use white or neutral towels to create a spa-like feel. |
Organize small items |
Store toiletries in apothecary jars for a clean and stylish look. |
Replace shower curtain |
Use a new, neutral-colored curtain to freshen up the space. |
Eliminate foul odors |
Use air fresheners or candles to ensure a pleasant scent. |
Clean mirrors and fixtures |
Polish mirrors and light fixtures for a sparkling finish. |
Bedrooms |
|
Use neutral bedding |
Replace old linens with fresh, neutral-colored bedding for a calming effect. |
Declutter and organize closets |
Showcase closet space by removing excess items and organizing neatly. |
Add table lamps or floor lamps |
Use soft lighting to create a cozy and inviting atmosphere. |
Remove personal items |
Take out family photos and personal décor to help buyers visualize the space as their own. |
Entryway and Curb Appeal |
|
Paint the front door |
Apply a fresh coat of paint in a bold yet neutral color for a positive first impression. |
Add a welcome mat |
Place a clean, new doormat to greet prospective buyers. |
Power wash exterior |
Clean siding, walkways, and driveways to enhance curb appeal. |
Add potted plants or flowers |
Use greenery to make the entrance more inviting. |
Replace outdoor light fixtures |
Update old fixtures to modern designs for a polished look. |
General Home Staging |
|
Maximize natural light |
Open blinds and curtains to let in as much natural light as possible. |
Use neutral colors |
Repaint walls in soft, neutral tones to appeal to a wide range of buyers. |
Deep clean the entire home |
Ensure every room is spotless, including carpets, baseboards, and corners. |
Fix squeaky doors and cabinets |
Make necessary repairs to avoid distractions during showings. |
Add minimal décor |
Use simple, tasteful decorative items to enhance visual interest without overwhelming the space. |
Eliminate pet hair and odors |
Clean thoroughly to remove any signs of pets for a fresh and neutral environment. |
Outdoor Living Spaces |
|
Stage patio or deck |
Arrange furniture to showcase outdoor living potential. |
Add throw blankets and pillows |
Use weather-resistant textiles to create a cozy outdoor vibe. |
Clean outdoor furniture |
Ensure all furniture is clean and in good condition. |
Highlight landscaping |
Trim bushes, mow the lawn, and add fresh mulch for a polished look. |

Home Staging Tips
Staging is not just about aesthetics; it’s about creating the perfect first impression. If you do it yourself or bring in a professional home stager, then following a detailed checklist makes the process so much easier. Be sure to clean the front door, style the living room for comfort, and highlight every unique feature of your house. We can make your home stand out and attract the right buyers. Download your checklist today and start your staging adventure.


Check Back for Updates to this Free Home Staging Checklist
I’m always on the lookout for exciting and innovative ways to stage a house. Maybe it’s using an area rug to define one room, adjusting the furniture scale for harmony, or transforming the master bedroom into a luxurious retreat, and every detail can make a big difference. I love seeking out current trends in interior design to timeless touches like apothecary jars filled with elegant accents. Staging is all about the critical steps that enhance your home’s appeal.
Pay special attention to small yet impactful elements that can breathe life into living areas and give your home a lived-in charm. If you’re preparing for an open house or just want to make your spaces shine, then I can help you every step of the way.
Join my newsletter today to stay updated on the latest staging tips, color palettes, and creative ideas to attract potential buyers. Let’s explore the art of effective staging together and make your home unforgettable. Don’t miss out on fresh perspectives that turn every house into a buyer’s dream.


![How to Host an OPEN HOUSE | [PREPARATION, HOSTING & FOLLOW UP]](https://i.ytimg.com/vi/j00A6fXl_n0/hqdefault.jpg)